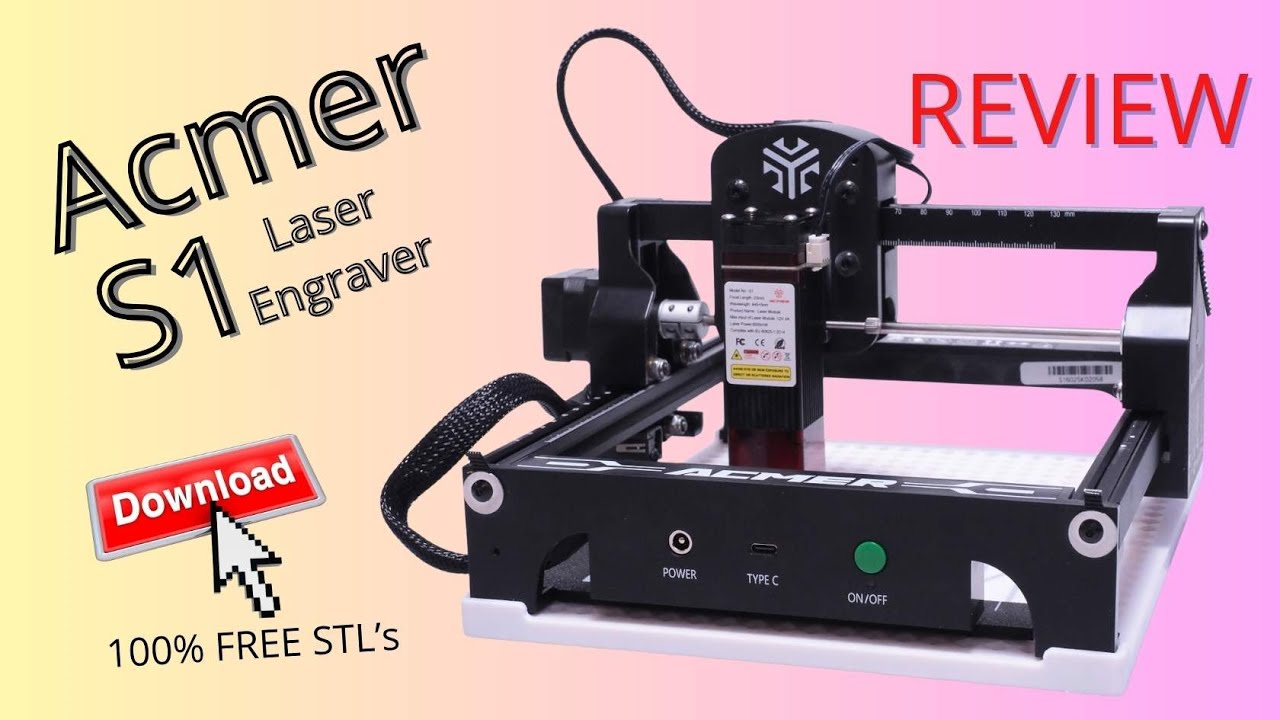
Skip to content
Back Home
3D-Printing, Laser Engraving and more.
  • Printers
    • What is a 3D Printer, and how does it work?
    • Anet 3D Printers
    • Anycubic 3D Printers
    • Artillery 3D Printers
    • Creality 3D Printers
    • Dutchy 3D Printers
    • Elegoo 3D Printers
    • Geeetech 3D Printers
    • Hypercube 3D Printer
    • JGAurora 3D Printers
    • Kingroon Printers
    • Longer 3D Printers
    • Lotmaxx 3D Printers
    • Ortur 3D Printers
    • Tronxy 3D Printers
    • XYZ Printing 3D Printers
  • 3D-Scanners
    • Creality Scan Ferret (SE – Normal – Pro)
  • Lasers
    • What is a diode laser engraver?
    • Alfawise Laser Engravers
    • Atezr Laser Engravers
    • Atomstack Laser Engravers
    • Beaverlab DavCarve L1
    • Creality Falcon2
    • Ikier Lasers
    • Longer Laser Engravers
    • Neje Master 20 Laser Engraver
    • Ortur Laser Engravers
    • Sculpfun Laser Engravers
    • TwoTrees Laser Engravers
  • Learn
    • Lightburn Software
    • Laser Safety 101: How to Properly Perform the Beilstein Test
  • About
    • Privacy Policy
    • Review Guidelines
  • Search
Back Home
  • Search
  • Printers
    • What is a 3D Printer, and how does it work?
    • Anet 3D Printers
    • Anycubic 3D Printers
    • Artillery 3D Printers
    • Creality 3D Printers
    • Dutchy 3D Printers
    • Elegoo 3D Printers
    • Geeetech 3D Printers
    • Hypercube 3D Printer
    • JGAurora 3D Printers
    • Kingroon Printers
    • Longer 3D Printers
    • Lotmaxx 3D Printers
    • Ortur 3D Printers
    • Tronxy 3D Printers
    • XYZ Printing 3D Printers
  • 3D-Scanners
    • Creality Scan Ferret (SE – Normal – Pro)
  • Lasers
    • What is a diode laser engraver?
    • Alfawise Laser Engravers
    • Atezr Laser Engravers
    • Atomstack Laser Engravers
    • Beaverlab DavCarve L1
    • Creality Falcon2
    • Ikier Lasers
    • Longer Laser Engravers
    • Neje Master 20 Laser Engraver
    • Ortur Laser Engravers
    • Sculpfun Laser Engravers
    • TwoTrees Laser Engravers
  • Learn
    • Lightburn Software
    • Laser Safety 101: How to Properly Perform the Beilstein Test
  • About
    • Privacy Policy
    • Review Guidelines

Bambu Lab AMS filled with Broken Filament? | Here is the fix.

Fixing broken filament inside your Bambu Lab AMS can be tricky, especially with the original AMS that came with the P1 and X1 series printers.

Did this video help you, …
and did it save you from hours of frustration?
Please buy me a coffee or a spool of filament here:
https://support.3D-PrintCreator.com (Paypal) Thanks!!!

In this video, I’ll show you exactly how to locate and remove jammed or broken filament pieces from your AMS -step-by-step-.

We’ll take the AMS apart safely, check the PTFE tubes, clear the internal hub, and reconnect everything properly (this includes a PRO TIP). This works for the Original Bambu Lab AMS, compatible with P1P, P1S, and X1C printers and almost all other Bambu Lab printers.

Whether your filament snapped inside the PTFE tube or in the Internal HUB, or your AMS won’t load filament anymore, this guide will help you get your printer back to work in minutes.

What You’ll Learn
– How to remove broken filament from the original Bambu Lab AMS
– How to identify where the filament is stuck (PTFE tube or internal hub)
– How to safely disconnect and reassemble the AMS
– How to test that all channels are clear

🧰 Tools Used
Basic hex screwdriver
About 60cm of GREEN filament (for testing)

📦 Works with:

✅ Bambu Lab AMS for P1 and X1 series printers
✅ The original AMS (not AMS-HT or AMS 2)

💡 Tips
If your AMS keeps jamming, try drying your filament or checking for sharp bends in the PTFE tubes.
Show More
Bambu Lab AMS filled with Broken Filament? | Here is the fix.
Now Playing
Bambu Lab AMS filled with Broken Filament? | Here is the fix.
Fixing broken filament inside your Bambu Lab AMS can be tricky, especially with the original AMS that came with the P1 and X1 series printers.

Did this video help you, …
and did it save you from hours of frustration?
Please buy me a coffee or a spool of filament here:
https://support.3D-PrintCreator.com (Paypal) Thanks!!!

In this video, I’ll show you exactly how to locate and remove jammed or broken filament pieces from your AMS -step-by-step-.

We’ll take the AMS apart safely, check the PTFE tubes, clear the internal hub, and reconnect everything properly (this includes a PRO TIP). This works for the Original Bambu Lab AMS, compatible with P1P, P1S, and X1C printers and almost all other Bambu Lab printers.

Whether your filament snapped inside the PTFE tube or in the Internal HUB, or your AMS won’t load filament anymore, this guide will help you get your printer back to work in minutes.

What You’ll Learn
– How to remove broken filament from the original Bambu Lab AMS
– How to identify where the filament is stuck (PTFE tube or internal hub)
– How to safely disconnect and reassemble the AMS
– How to test that all channels are clear

🧰 Tools Used
Basic hex screwdriver
About 60cm of GREEN filament (for testing)

📦 Works with:

✅ Bambu Lab AMS for P1 and X1 series printers
✅ The original AMS (not AMS-HT or AMS 2)

💡 Tips
If your AMS keeps jamming, try drying your filament or checking for sharp bends in the PTFE tubes.
Show More
Bambu Lab Part Cooling Fan Exploded – What Really Happened Inside?
Now Playing
Bambu Lab Part Cooling Fan Exploded – What Really Happened Inside?
If your Bambu Lab printer has a broken part cooling fan, and shows the error “0300-3100-0001-0001” or “part cooling fan stopped,” this video explains what causes it and why not …to ignore it.

At first, the printer itself showed this error on screen, but nothing appeared inside Bambu Studio, and all my prints came out perfectly fine.
So I ignored it… until I found small pieces of black plastic inside my prints and later on my print bed.

After investigating, I discovered that my part cooling fan had literally exploded inside the housing! The fan was still spinning (or at least felt like it was), but the blades were completely gone.

According to the official Bambu Lab Wiki this error can mean:
– The fan is stuck by debris or filament strings
– The connector is loose
– The fan itself is broken

In my case, the fan motor worked — but the blades disintegrated, probably due to a small piece of filament getting inside.

If you ever see this error, don’t ignore it — check your part cooling fan carefully with good lighting and listen for rattling sounds.

00:00 Intro — The mysterious error
00:17 HMS_0300-3100-001-001
01:04 False alarm?
01:23 No problems with printing
01:46 First signs of a real problem
02:42 Detaching the part cooling fan
04:41 Conclusion
Show More
How to Align 3D Scan in Fusion (Step-by-Step Tutorial)
Now Playing
How to Align 3D Scan in Fusion (Step-by-Step Tutorial)
This video shows how to Align 3D scans in Fusion, without complicated tricks.
Learn how to perfectly align and reference your 3D scan data to the origin in Fusion 360 using …
this clear step-by-step tutorial. I’ll show you how to import a mesh (OBJ, STL, or 3MF), create construction planes, axes, and points, and then use the Align and Move tools to position your scanned model exactly where you need it.

In this example, I’m using a Parkside battery scan from my Creality Raptor Pro 3D scanner, but this method works with any 3D scanner or mesh file. Whether you’re working with reverse engineering, 3D modeling, or prototyping, this workflow will save you a lot of time.

🧠 What you’ll learn:
– How to import 3D scan data (OBJ / STL / 3MF) into Fusion 360
– How to create reference planes through 3 points for alignment
– How to unground mesh bodies and convert them to components
– Why OBJ files work smoother than compressed STL files
– How to align your scan perfectly to Fusion’s origin axes (X, Y, Z)
– How to find the exact center of your model using construction geometry
– How to prepare your scan for accurate modeling or design overlays

⚙️ Software & tools used:
– Autodesk Fusion (latest version)
– Creality Raptor Pro (but this will work with data from any scanner)
– OBJ & STL mesh files

📁 Related topics:
Fusion alignment, reference scan origin, 3D mesh workflow, reverse engineering in Fusion, scan to CAD, Fusion tutorial for beginners, Fusion mesh to solid, how to import OBJ in Fusion, align mesh to origin, 3D scan design workflow.

📺 If this tutorial helped you, please give it a Like 👍 and Subscribe!
It really helps others find this video and supports the channel.

00:00 Introduction — Referencing 3D Scan Data in Fusion 360
00:33 Why Use Scan Data Instead of Calipers
01:30 Identifying Flat and Curved Reference Points
03:40 Overview of the Scan Alignment Strategy
04:40 Importing the Mesh File (OBJ vs STL)
05:30 Creating a Separate Component for the Mesh
06:20 Ungrounding the Mesh Component (Important Step)
07:10 Switching to Mesh Workspace
08:00 Entering Direct Edit Mode
09:20 Creating Construction Planes Through Three Points
10:50 Building Additional Planes for Alignment
12:10 Creating a Midplane and Finding the Center
13:30 Creating an Axis and Reference Point
14:40 Finishing Direct Edit Mode and Switching to Solid Workspace
15:00 Aligning the First Plane to the XY Origin
15:50 Aligning the Axis to the X Plane (Check Orientation)
16:50 Verifying Alignment and Centering the Model
17:20 Moving the Model to the Exact Origin (Point to Point)
18:00 Perfectly Aligned Scan Ready for Modeling
18:40 Conclusion — Ready for Next Step: Recreating the Model

▼ WATCH MY FREE WEBSITE HERE ▼
https://3d-printcreator.com

▼ VISIT MY MODELS ON MAKERWORLD ▼
https://makerworld.com/nl/@3d_printcreator

▼ SOCIALS ▼
Subscribe to YouTube: http://subscribe.3d-printcreator.com
Facebook: https://www.facebook.com/3DprintCreator/
Instagram: https://www.instagram.com/3dprintcreator/
Twitter – X: https://twitter.com/Brian_3DPC

#whyiscan
https://www.facebook.com/Creality3dscanner/
@Creality3DScanner​
Show More
I Made parkside powertool accessories with my 3D printer for ALL Parkside 20V Tools
Now Playing
I Made parkside powertool accessories with my 3D printer for ALL Parkside 20V Tools
Find all my parkside powertool accessories for free on MakerWorld.
https://makerworld.com/nl/collections/4257271-parkside
Discover the ultimate universal 3D-printed accessories for your Parkside 20V powertools, whether you’re using a Parkside drill, jigsaw, heat gun, or …
glue gun — these snap-on tool holders fit every 20V battery perfectly. No more designs that only fit one tool model!

Print your own interchangeable bit holders, glue stick mounts, and saw blade attachments that simply snap on and off your Parkside battery.

💡 Download all free models here:
👉 https://makerworld.com/nl/collections/4257271-parkside

🧠 Works with all Parkside 20V Team, Performance, and Expert tools from LIDL.

0:00 Intro
0:30 Why Parkside tools aren’t compatible
1:15 The universal battery mount
2:40 Snap-on demo
4:00 Glue stick holder
5:30 Jigsaw holder
6:10 Free downloads & thanks

If you like these designs, please give a boost on MakerWorld — it really helps to keep new designs coming!

#3DPrinting #ParksideTools #3DPrintCreator #MakerWorld #Parkside20V #SnapOnSystem
Show More
I 3D printed a Suzuki Car Key Housing because we couldn't buy it
Now Playing
I 3D printed a Suzuki Car Key Housing because we couldn't buy it
My friend has a Suzuki and his car key broke. He needed a replacement Suzuki Car Key Housing, but for his car, that was not available anywhere.
Download the FREE …
stl files here:
https://makerworld.com/en/models/1682674-suzuki-car-key-replacement-housing

My friend’s old Suzuki car key was falling apart, the case was completely broken and way too weak to glue back together.
Instead of trying to repair it, I decided to design and 3D print a brand-new housing that’s much stronger than the original.

Here’s how I did it:
– Scanned the internal parts of the original key using a Creality Raptor Pro 3D scanner
– Imported the scans into Fusion 360 to design a new, durable case around the real internals
– Printed the housing in strong material to create a solid, working replacement key

This way, the transponder, buttons, and metal blade all fit perfectly — but in a much tougher case than Suzuki originally made.

🔑 Would you try 3D printing your own car key housing? Let me know in the comments!

▼ USED PRODUCTS IN THIS VIDEO : ALSO SEE THE FIRST COMMENT ▼
– Creality Raptor Pro scanner
– Fusion
– a Bambu Lab P1S Printer and PETG filament

▼ WATCH MY FREE WEBSITE HERE ▼
https://3d-printcreator.com

▼ SOCIALS ▼
Subscribe to YouTube: http://subscribe.3d-printcreator.com
Facebook: https://www.facebook.com/3DprintCreator/
Instagram: https://www.instagram.com/3dprintcreator/
Twitter – X: https://twitter.com/Brian_3DPC
Show More
LightGrid Modular Mini Studio | Miniature photo studio
Now Playing
LightGrid Modular Mini Studio | Miniature photo studio
The LightGrid Modular Mini Studio is a FREE Macro and Figurine studio that you can 3D print and use to photograph your figurines. Use the profiles provided with the download.

Download …
here:
https://makerworld.com/en/models/1514537-lightgrid-modular-mini-studio

▼ WATCH MY FREE WEBSITE HERE ▼
https://3d-printcreator.com

▼ SOCIALS ▼
Subscribe to YouTube: http://subscribe.3d-printcreator.com
Facebook: https://www.facebook.com/3DprintCreator/
Instagram: https://www.instagram.com/3dprintcreator/
Twitter – X: https://twitter.com/Brian_3DPC
Show More


Review Request
For review requests you can sent an email to:
info@3d-printcreator.com

Postal Address / Reception of goods
Brian Dragtstra
Minervaweg 5 (B-2134)
8239 DL Lelystad
The Netherlands

Company info
FoVi3D / 3D-PrintCreator
Punter 23 57
8242 DW Lelystad
The Netherlands

© 2025 3D-PrintCreator – All rights reserved

Powered by WP – Designed with the Customizr theme

We use cookies, and you will love them.
We use cookies on our website to give you the most relevant experience by remembering your preferences and repeat visits. By clicking “Accept All”, you consent to the use of ALL the cookies. However, you may visit "Cookie Settings" to provide a controlled consent.
Cookie SettingsAccept All
Manage consent

Privacy Overview

This website uses cookies to improve your experience while you navigate through the website. Out of these, the cookies that are categorized as necessary are stored on your browser as they are essential for the working of basic functionalities of the website. We also use third-party cookies that help us analyze and understand how you use this website. These cookies will be stored in your browser only with your consent. You also have the option to opt-out of these cookies. But opting out of some of these cookies may affect your browsing experience.
Necessary
Always Enabled
Necessary cookies are absolutely essential for the website to function properly. These cookies ensure basic functionalities and security features of the website, anonymously.
CookieDurationDescription
cookielawinfo-checkbox-analytics11 monthsThis cookie is set by GDPR Cookie Consent plugin. The cookie is used to store the user consent for the cookies in the category "Analytics".
cookielawinfo-checkbox-functional11 monthsThe cookie is set by GDPR cookie consent to record the user consent for the cookies in the category "Functional".
cookielawinfo-checkbox-necessary11 monthsThis cookie is set by GDPR Cookie Consent plugin. The cookies is used to store the user consent for the cookies in the category "Necessary".
cookielawinfo-checkbox-others11 monthsThis cookie is set by GDPR Cookie Consent plugin. The cookie is used to store the user consent for the cookies in the category "Other.
cookielawinfo-checkbox-performance11 monthsThis cookie is set by GDPR Cookie Consent plugin. The cookie is used to store the user consent for the cookies in the category "Performance".
viewed_cookie_policy11 monthsThe cookie is set by the GDPR Cookie Consent plugin and is used to store whether or not user has consented to the use of cookies. It does not store any personal data.
Functional
Functional cookies help to perform certain functionalities like sharing the content of the website on social media platforms, collect feedbacks, and other third-party features.
Performance
Performance cookies are used to understand and analyze the key performance indexes of the website which helps in delivering a better user experience for the visitors.
Analytics
Analytical cookies are used to understand how visitors interact with the website. These cookies help provide information on metrics the number of visitors, bounce rate, traffic source, etc.
Advertisement
Advertisement cookies are used to provide visitors with relevant ads and marketing campaigns. These cookies track visitors across websites and collect information to provide customized ads.
Others
Other uncategorized cookies are those that are being analyzed and have not been classified into a category as yet.
SAVE & ACCEPT